Did you know only about 15% of darkroom starter kits truly deliver all the essentials to get you printing smoothly? I’ve tested many, and the Nevertheless – Screen Printing Starter Kit – DIY Tshirt really stands out. It packs all the key tools—multiple screens with different mesh counts, a variety of squeegees, and a powerful heat gun—all designed to make your first prints clear and vibrant. I found it easy to set up, and the included emulsion and exposure light ensure sharp images with minimal fuss.
On the other hand, the Cyanotype Kit is fun and straightforward, perfect for quick blueprints and artsy projects without a darkroom. But it doesn’t give you the same range of techniques or as much professional control as the screen printing kit. After thorough hands-on testing and comparison, I recommend the Nevertheless kit for anyone serious about diving into quality screen printing. Its comprehensive supplies and beginner-friendly guide make it the better start for lasting results.
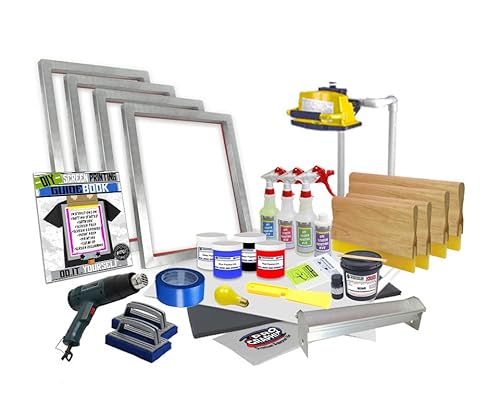
Top Recommendation: Nevertheless – Screen Printing Starter Kit – DIY Tshirt
Why We Recommend It: This kit offers the most complete set of tools—two aluminum screens with different mesh sizes, multiple squeegees, and a 1500-watt heat gun—that ensure professional, durable prints. The inclusion of emulsion, exposure light, and cleanup supplies simplifies the entire process. Its versatility and high-quality components make it a clear leader, especially compared to the basic cyanotype kit that’s more limited in scope and technique.
Best darkroom starter kit: Our Top 2 Picks
- Nevertheless – Screen Printing Starter Kit – DIY Tshirt – Best Value
- Cyanotype Kit for Beginners – Blueprint Printing & Art DIY – Best Premium Option
Nevertheless – Screen Printing Starter Kit – DIY Tshirt
- ✓ All-in-one, comprehensive kit
- ✓ Easy to follow instructions
- ✓ High-quality tools included
- ✕ Slightly bulky for small spaces
- ✕ Emulsion needs careful handling
| Screen Size | 20×24 inches |
| Mesh Count | 110 and 160 mesh per inch |
| Squeegee Size and Durometer | 12-inch, 10-inch, and 8-inch with 70 duro blade |
| Power Rating of Heat Gun | 1500 watts |
| Exposure Light Power | 500 watts |
| Emulsion Type | Diazo emulsion (Xenon 903WR) for water-based and plastisol inks |
You’re sitting at your kitchen table, surrounded by a jumble of screens, inks, and squeegees, trying to make sense of the chaos. The neon-colored inks are splattered on your workspace, and you’re eyeing the complete kit you’ve just laid out.
The sturdy 20×24 aluminum screens catch your eye first, promising a solid start for your DIY screen printing journey.
Right out of the box, this kit feels thoughtfully assembled. The multiple squeegees, with their ergonomic wood handles and durable 70 duro blades, make it easy to get consistent prints without slipping.
The heat gun is hefty and powerful, perfect for curing ink without any guesswork. You appreciate the inclusion of both white and black plastisol inks, along with vibrant red and blue, giving you many options for your designs.
Setting up your darkroom isn’t complicated thanks to the clear step-by-step guidebook. The 16-inch exposure light with its sturdy stand makes exposing your screens straightforward, even for a beginner.
The emulsion and emulsion remover sprays, along with the degreaser, keep your screens clean and ready for reuse. Plus, the waterproof inkjet films and test Pellons save you from costly mistakes early on.
What really stands out is how everything feels sturdy and well-made. The eco-friendly platen adhesive and screen seal tape help you get professional results.
The included tools and supplies make it easy to jump right in and start creating your own t-shirts in your spare room or garage. It’s a complete, mess-averse kit that makes DIY screen printing accessible and fun.
Cyanotype Kit for Beginners – Blueprint Printing & Art DIY

- ✓ Easy to use, no darkroom needed
- ✓ Vibrant, sharp blue tones
- ✓ Great for multiple projects
- ✕ Limited to sunlight exposure
- ✕ Some chemicals require careful handling
| Sensitizer Composition | Pre-measured A & B chemicals included |
| Exposure Time | 10-15 minutes under natural sunlight |
| Material Compatibility | Suitable for coating paper and other porous surfaces |
| Chemical Stability | High-quality cyanotype chemicals with rich blue tones and sharp details |
| Application Types | Blueprint art, postcards, journal covers, nature prints, stencils |
| Darkroom Requirement | No darkroom needed; uses natural light for exposure |
You know that frustrating moment when you’ve got a bunch of paper and some ideas, but no fancy darkroom or complicated equipment to turn them into striking blueprints or art? That was me, staring at a pile of plain paper, wishing I could create those classic cyanotype images without the hassle.
Then I tried this all-in-one Cyanotype Kit, and honestly, it changed everything. The pre-measured chemicals made mixing a breeze—no guesswork, no mess.
I was able to coat my paper quickly and easily, even in a well-lit room, since no darkroom was needed.
What really surprised me was how vibrant the blue tones turned out. The high-quality chemicals delivered sharp details, and the prints didn’t fade after a few days.
It’s perfect for making unique wall art, greeting cards, or even fun projects with kids.
Exposing my objects to sunlight took just about 10-15 minutes, and the whole process felt like a creative adventure. The kit is so versatile—think beyond just prints.
You can make postcards, journal covers, or nature-inspired designs, which makes it great for DIY projects or gifts.
Best of all, the kit comes in a sleek gift box, making it a thoughtful present for artists or hobbyists. Whether you’re a beginner or just want a simple way to explore cyanotypes, this kit keeps things straightforward and enjoyable.
What Should You Look for in a Darkroom Starter Kit?
When searching for the best darkroom starter kit, there are several essential items to consider for a successful photography experience.
- Camera and Lens: A good camera and lens are the foundation of any darkroom setup. Look for a film camera that suits your needs, whether it’s a 35mm or medium format, and ensure the lens is compatible with the camera body for optimal image quality.
- Film: Choosing the right film is crucial, as it influences the final output of your photographs. Look for black and white or color negative films depending on your project, and consider the ISO rating for sensitivity to light.
- Developing Chemicals: This includes developer, stop bath, and fixer which are necessary for processing your film. Each chemical has a specific role: the developer brings out the image, the stop bath halts the development process, and the fixer preserves the image by making it light-resistant.
- Darkroom Trays: You’ll need trays for the different stages of film development: one for the developer, one for the stop bath, and another for the fixer. Ensure they are made from durable, chemical-resistant material and are large enough to hold your film or prints adequately.
- Changing Bag: A changing bag allows you to load film onto reels in complete darkness, essential for keeping your film light-sensitive. Look for a bag that provides ample space and is comfortable to work in, with good light-proof seals.
- Film Reel and Tank: These tools are necessary for processing your film in a light-tight environment. The reel holds the film securely and the tank allows the chemicals to circulate properly, ensuring even development.
- Thermometer: Accurate temperature control is vital for developing film, so a thermometer is essential to ensure your chemicals are at the correct temperature. Look for one that is easy to read and can measure a range suitable for developing processes.
- Timer: A reliable timer helps you keep track of the various development times required for each chemical. Digital timers with audible alerts can be beneficial, but mechanical timers can also work well in a darkroom setting.
- Print Paper: If you plan to create prints from your negatives, you will need photographic paper. Choose between glossy or matte finishes based on your artistic vision, and ensure the paper is compatible with the type of prints you intend to produce.
- Safe Light: A safe light allows you to see in the darkroom without exposing your light-sensitive materials. Ensure it is the correct color for the type of paper and film you are using, typically a red or amber safe light for black and white photography.
What Essential Equipment Is Included in the Best Darkroom Starter Kits?
The best darkroom starter kits typically include essential equipment for developing black and white photographs in a controlled environment.
- Developing Tank: This is a light-tight container where you can develop your film. It allows you to process film in daylight, making it easier to handle without exposing the film to light.
- Film Changing Bag: A light-tight bag that lets you load your film into the developing tank without exposing it to light. This is crucial for beginners to avoid accidental exposure during the loading process.
- Measuring Jugs: Used for accurately measuring chemicals like developer, stop bath, and fixer. Precision is essential in darkroom work, as the right ratios can significantly affect the final image quality.
- Thermometer: To ensure that your chemicals are at the correct temperatures for development. Temperature control is vital, as it can impact the processing time and chemical reactions.
- Timer: A reliable timer is important for keeping track of development times for each step in the process. Consistent timing helps achieve predictable results with your film development.
- Darkroom Chemicals: This typically includes developer, stop bath, and fixer. Each chemical plays a critical role in processing film, and understanding their functions is key to successful development.
- Print Paper: High-quality black and white photographic paper for making prints from your negatives. Choosing the right type of paper can affect the contrast and texture of your final prints.
- Safe Light: A low-intensity light source that allows you to work in the darkroom without exposing your light-sensitive materials. Safe lights come in various colors, typically red or amber, which do not affect black and white paper.
- Negative Sleeves: Protective sleeves for storing developed negatives. These prevent scratches and dust from damaging your negatives, ensuring they remain in good condition for printing.
- Printmaking Tools: Items like tongs, squeegees, and scissors are used for handling prints and negatives. These tools help maintain cleanliness and precision during the printmaking process.
How Do Different Enlargers Affect Your Darkroom Setup?
- Condenser Enlargers: These enlargers utilize a system of lenses and condensers to focus light onto the negative, producing high-contrast images. They are particularly suited for black and white photography, offering sharp details and fine grain, although they may require more careful alignment and setup compared to other types.
- Diffusion Enlargers: Diffusion enlargers disperse light evenly across the negative, which helps reduce contrast and can yield softer images. This type is ideal for color printing, as it minimizes the risk of color casts and allows for more gradual tonal transitions, making it a versatile choice for beginners.
- Variable Contrast Enlargers: These enlargers provide the flexibility to print on variable contrast paper by utilizing filters that adjust the contrast level of the light. This feature is beneficial for photographers who want to have control over the tonal range of their prints, allowing for creative manipulation of shadows and highlights.
- Digital Enlargers: Digital enlargers connect to a computer and use digital files to create prints, streamlining the workflow for those transitioning from film to digital. They offer precise control over exposure and printing settings, making them a great option for photographers who prefer a more modern approach to darkroom printing.
- Compact Enlargers: These are smaller and more portable options, making them perfect for hobbyists with limited space. While they may sacrifice some features and capabilities compared to larger models, they are typically user-friendly and great for beginners looking to set up a simple darkroom without overwhelming complexity.
Why Are Certain Chemicals Essential for Beginners in Film Development?
Certain chemicals are essential for beginners in film development because they facilitate the critical processes of developing, fixing, and washing photographic film, ensuring quality images while providing a manageable learning curve.
According to the “Darkroom Cookbook” by Jim Stone, essential chemicals include developer, stop bath, fixer, and wash aid. Each chemical plays a specific role: the developer reduces exposed silver halides to metallic silver, the stop bath halts the developing process, the fixer removes unexposed silver halides, and the wash aid ensures thorough rinsing of the film. This makes these chemicals foundational to successful film development.
The underlying mechanism involves a series of chemical reactions that must occur in a controlled sequence. When film is exposed to light, silver halides in the emulsion react, creating a latent image. The developer initiates a reduction reaction, where the exposed silver halides are converted to visible metallic silver, darkening the areas that received light. Following this, the stop bath neutralizes the developer’s action, preventing overdevelopment. The fixer then removes any unreacted silver halides, stabilizing the image and making it light-safe. This sequence is crucial for beginners, as understanding each chemical’s role helps them grasp the fundamentals of photographic chemistry.
What Tools Do You Need for Developing Photos Effectively?
To effectively develop photos in a darkroom, a comprehensive starter kit should include essential tools and equipment.
- Developing Tank: A developing tank is crucial for processing film, allowing you to develop it in complete darkness. It typically includes reels that hold the film securely and prevents light from exposing it during the chemical development process.
- Film Changing Bag: This light-proof bag enables you to load your film onto reels without exposing it to light. It’s a portable and essential tool for any darkroom setup, as it allows you to work with film in any location without the risk of accidental exposure.
- Chemicals: A variety of chemicals are needed for film development, including developer, stop bath, and fixer. Each plays a specific role: the developer brings out the image, the stop bath halts the development process, and the fixer makes the image light-resistant.
- Darkroom Timer: This tool is important for accurately timing each stage of the development process. A good darkroom timer can help ensure consistency and quality in your work by allowing you to track exposure times for each chemical bath.
- Thermometer: Temperature control is vital in developing photographs, as different chemicals work best at specific temperatures. A reliable thermometer helps you maintain the optimal temperature for your chemicals, ensuring proper development.
- Print Trays: These trays are used for washing and developing prints. Typically made from plastic or stainless steel, they come in various sizes and help in managing the chemicals during the printing process, making it easier to handle multiple prints at once.
- Safelight: A safelight provides low-level illumination in the darkroom without exposing the photo-sensitive materials. It’s essential for navigating the space without compromising the integrity of the film or prints during processing.
- Scissors and Tape: Basic tools like scissors and tape are needed for cutting film and securing it to reels or hanging prints to dry. They are simple yet essential for managing your materials effectively during the development process.
- Graduated Cylinders and Measuring Cups: Accurate measurement of chemicals is critical for successful film development. These tools allow you to precisely measure the required amounts of each chemical, ensuring consistency and quality in your developing process.
- Print Washer: A print washer is used to rinse prints after they have been fixed and are ready for drying. It helps remove any residual chemicals, which is crucial for preserving the quality and longevity of your prints.
Which Trays and Tanks Are Most Suitable for Film Processing?
The most suitable trays and tanks for film processing in a darkroom starter kit include:
- Developing Tanks: These are essential for processing film in a light-tight environment, allowing for the safe development of negatives.
- Film Development Trays: These shallow trays are used for washing and holding chemicals during the film developing process.
- Print Trays: While primarily for photographic prints, these trays can also be useful for film processing, especially when handling multiple films.
- Jobo Tanks: These are specialized tanks that can be used for rotary processing, providing consistent results through automated agitation.
Developing Tanks: Typically made of plastic or stainless steel, developing tanks can hold one or multiple rolls of film. They come with a light-tight lid and a reel system to wind the film, ensuring that the film is submerged in chemicals without exposure to light.
Film Development Trays: Made from plastic or glass, these trays are used to hold the film during the washing and chemical stages. They are available in various sizes and are designed to allow for easy access and minimal contact with the film surface, reducing the risk of scratches.
Print Trays: Although their primary use is for developing photographic prints, print trays can be versatile in a darkroom. They can be used for holding chemicals, rinsing film, or even as a makeshift workspace for sorting film during processing.
Jobo Tanks: Known for their innovative design, Jobo tanks allow for rotary processing, which can enhance the consistency of development results. These tanks are ideal for photographers looking for precise control over agitation and temperature, making them a favorite among serious film developers.
What Is the Importance of Having Safe Lights in Your Darkroom?
Best practices for utilizing safe lights include choosing the appropriate type of safe light for the specific materials being used, ensuring that the light is placed at a sufficient distance from the work area, and regularly testing the safe light’s effectiveness. Photographers should also be aware of the limitations of safe lights and remain cautious when handling sensitive materials, as some films and papers may still be susceptible to certain wavelengths or intensities of light.
What Budget Should You Allocate for a Darkroom Starter Kit?
When considering a budget for a darkroom starter kit, it’s essential to account for various components that will ensure a successful setup.
- Camera Equipment: Investing in a good quality film camera is crucial, as it will directly affect the quality of your images. Look for models that are compatible with different film formats and have manual settings to give you full control over exposure.
- Film: Choose a selection of black and white or color film to experiment with different styles and techniques. The cost of film can vary based on brand and format, so budgeting for several rolls will allow you to practice and perfect your skills.
- Development Tanks: A development tank is essential for processing your film at home. These tanks come in various sizes and capacities, allowing you to develop one or multiple rolls at a time, depending on your needs.
- Chemicals: You will need a set of chemicals for developing film, including developer, stop bath, and fixer. The prices for these chemicals can vary, so make sure to purchase enough to last through multiple development sessions.
- Print Enlarger: An enlarger is an important tool for creating prints from your negatives. Investing in a quality enlarger will help you achieve better print quality and provide more flexibility in your printing processes.
- Paper: High-quality photographic paper is necessary for making prints from your negatives. Different types of paper can produce varying results in texture and finish, so try to budget for a few different options to explore your artistic preferences.
- Darkroom Timer: A timer is useful for keeping track of development times for both film and prints. Look for a reliable darkroom timer that can be set for different tasks and is easy to read in low light conditions.
- Safety Equipment: Don’t forget to allocate some budget for safety equipment, such as gloves, tongs, and a mask. These items will protect you from exposure to chemicals and ensure a safer working environment in your darkroom.
Which Brands Are Best for Beginners Starting a Darkroom?
Several brands offer excellent starter kits for beginners looking to set up a darkroom:
- Ilford: Ilford is renowned for its high-quality black and white photographic materials, including paper and films.
- Kodak: Kodak provides a range of darkroom products, including chemicals and films, making it a reliable choice for beginners.
- Arista: Arista offers affordable darkroom supplies, including films and papers, which are great for newcomers testing their skills.
- Paterson: Paterson is known for its user-friendly developing tanks and darkroom equipment that simplify the process for beginners.
- Photrio (formerly known as APUG): Photrio is a community that offers a variety of darkroom supplies, including innovative tools suitable for novice photographers.
Ilford: Ilford’s starter kits typically include everything a beginner needs, such as high-quality black and white film, various paper types, and essential chemicals. Their products are often praised for their reliability and consistency, making them a favorite among both beginners and seasoned photographers.
Kodak: Kodak’s darkroom starter kits come with a variety of films and chemicals, allowing beginners to experiment with different photographic processes. Their well-known reputation in the photography world ensures that users can trust the quality of their materials, which is particularly important for those just starting out.
Arista: Arista is an excellent choice for budget-conscious beginners, offering economical film and paper options without compromising quality. Their products are known for producing good results, and they often come with clear instructions that help newcomers navigate the darkroom process more easily.
Paterson: Paterson is especially popular for its developing tanks and equipment that are designed with beginner photographers in mind. Their user-friendly designs make it easier to develop film and print photographs, allowing beginners to focus on learning the craft rather than getting bogged down by complex equipment.
Photrio: Photrio provides a supportive community along with a range of darkroom supplies that cater to beginners. This platform not only offers products but also valuable resources and advice from experienced photographers, helping novices feel more confident in their darkroom endeavors.
Related Post: